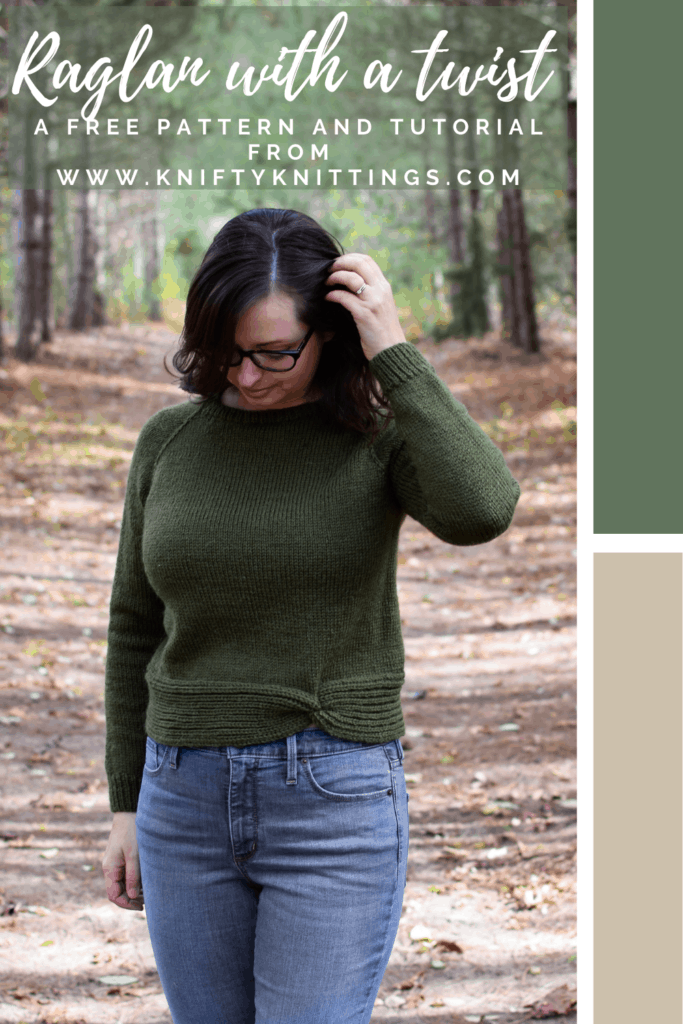
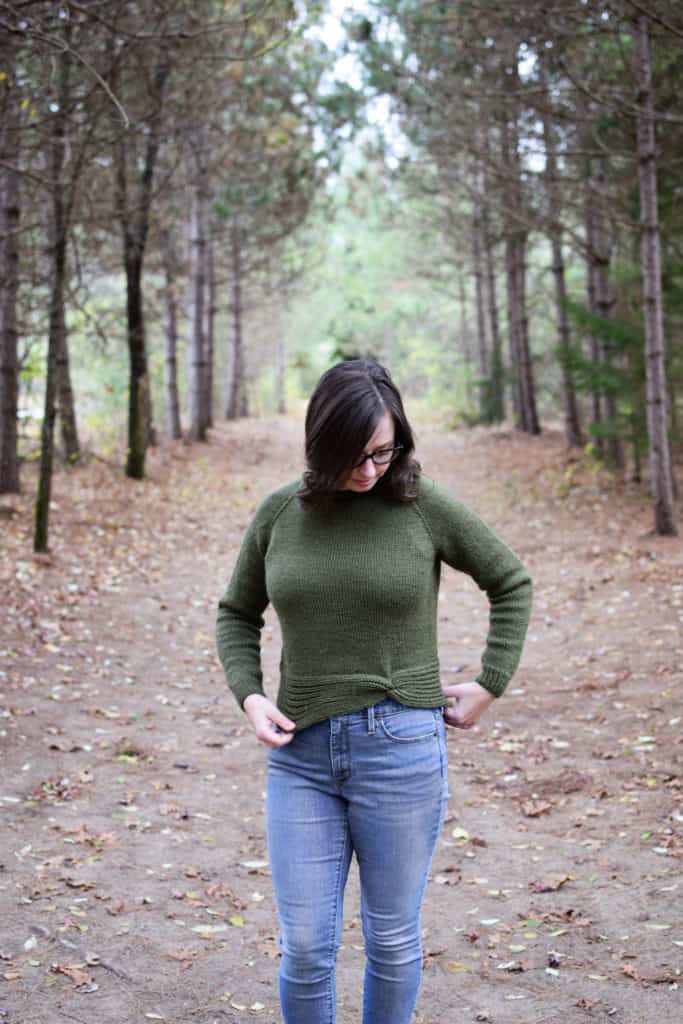
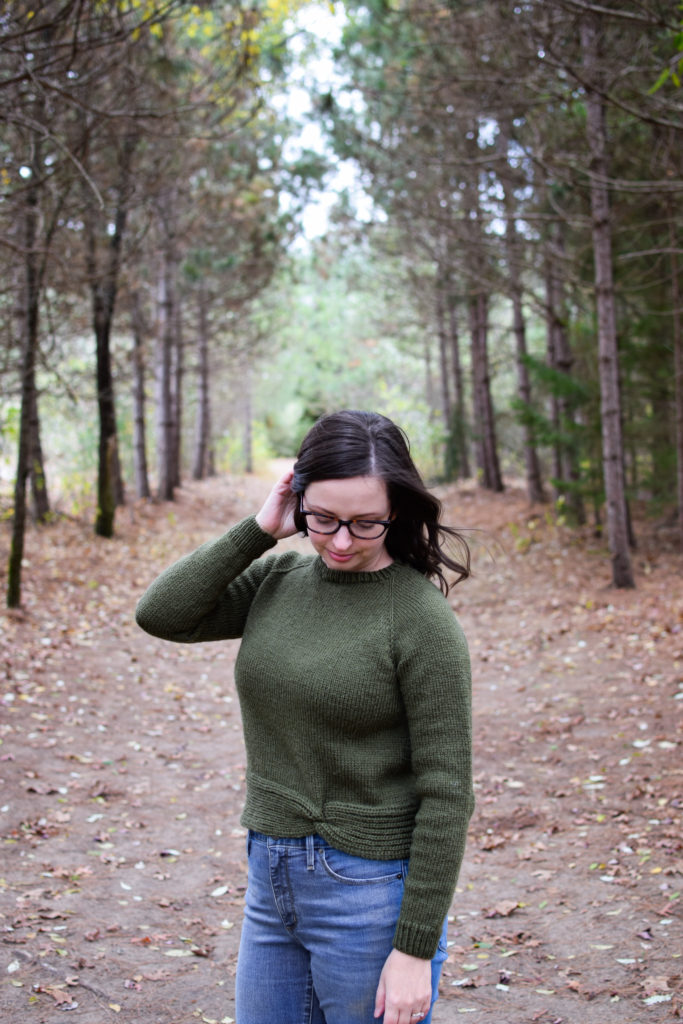
Happy Friday, friends! Well she’s been a long time in the making, but I’m so happy to share that my newest pattern in collaboration with Lion Brand Yarn – Raglan with a Twist – is finally here!
I feel like I say this with every pattern release, but this is my most favorite design to date, and the one that I’ve worked the hardest on.
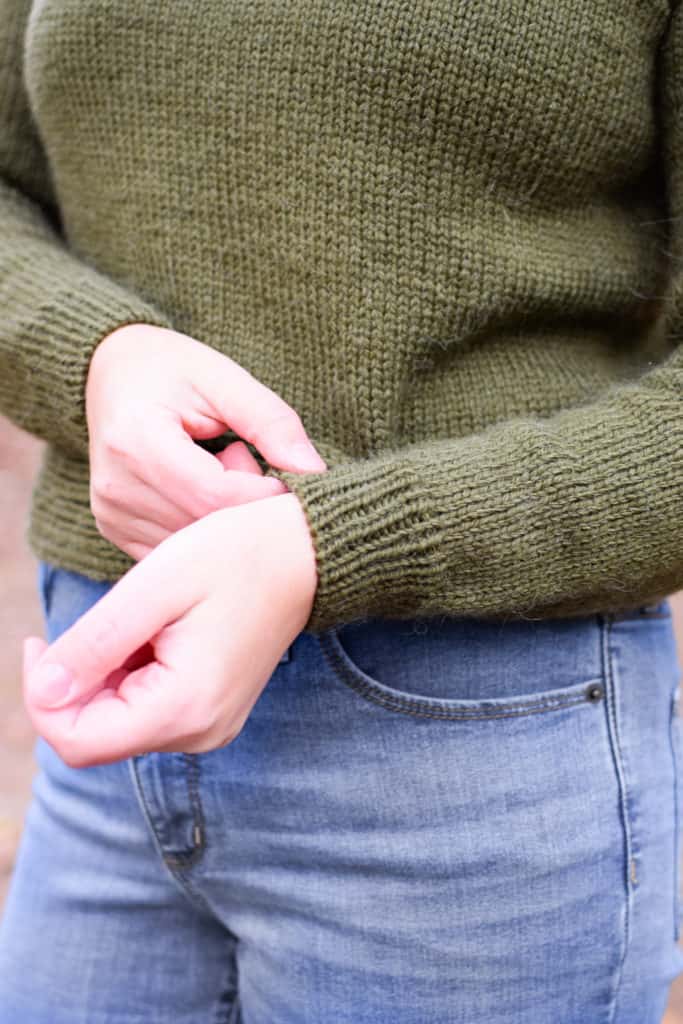
The Raglan with a Twist combines a classic raglan shape with a unique applied hem and subtle slipped stitch raglan increases. It is worked top down, featuring a cropped length intended to be worn with 2-4 inches of positive ease for a flattering fit. Simply measure your bust, add your desired amount of ease, and choose the size with the closest measurement.
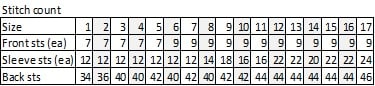
It is written in 17 sizes from a 34 in to a 72 in finished bust, so everyone can knit their perfect size! Sweater shown is size 4 with 2 inches of positive ease. *Please note – size numbers (i.e. 1, 2, 3, 4…) do not correspond with standard US sizes. Measure your bust to find your appropriate size.
Keep scrolling for the free pattern, or purchase the ad-free PDF through the link below.
This pattern includes a full step-by-step video tutorial, which can be accessed below or on YouTube.
Intro 0:00:00
Casting on 0:00:14
Raglan increases 0:01:55
Cable cast on 0:04:05
Joining in the round 0:06:32
Divide for sleeves 0:07:42
Hem 0:10:50
Hem twist 0:17:30
Sleeves 0:19:46
Tubular bind off 0:22:05
Neckline 0:25:31
Let’s get started!
Yarn
4 (4, 5, 5, 5, 5) (6, 6, 6, 6, 6) (6, 7, 7, 7, 8) 8 skeins Lion Brand Touch of Alpaca (207 yds/190 m per 100 g), or similar worsted weight yarn
786 (820, 870, 894, 936, 970) (1050, 1065, 1082, 1124, 1156) (1220, 1252, 1285, 1381, 1472) 1558 yds/718 (750, 795, 817, 856, 887) (960, 974, 989, 1027, 1057) (1115, 1144, 1175, 1262, 1346) 1424 m
Needles
US 5/3.75 mm 32 in circular needle
US 6/4 mm in preferred needles for small circumference knitting (DPNs or magic loop method)
US 7/4.50 mm 24-32 in circular needle and preferred needles for small circumference knitting
*or size needed to obtain gauge
Notions
Stitch markers
Waste yarn
Yarn needle for weaving in ends and seaming
Gauge
18 sts and 24 rows = 4 in/10 cm in Stockinette stitch in the round with US 7/4.50 mm needles (blocked)
*Take time to check gauge to ensure an accurate fit
Sizes
1 (2, 3, 4, 5, 6) (7, 8, 9, 10, 11) (12, 13, 14, 15, 16) 17
Finished bust circumference:
34 (36, 38, 40, 42, 44) (46, 48, 50, 52, 54) (56, 58, 60, 64, 68) 72 in/86.5 (91.5, 96.5, 101.5, 107, 112) (117, 122, 127, 132, 137) (142, 147.5, 152.5, 162.5, 173) 183 cm
Abbreviations
BOR – beginning of round
CO – cast on
k – knit
k1b – knit one below
M1L – make one left
M1R – make one right
p – purl
pm – place marker
RS – right side of work
sl – slip
sl1k – sl 1 st knitwise
sl1p – sl 1 st purlwise
sm – slip marker
ssk – hem: sl 1 st purlwise, sl 1 st knitwise, knit these 2 sts together through back loops. Sleeves: sl 1 st knitwise, sl 1 st knitwise, knit these 2 sts together through back loops.
st(s) – stitch(es)
St st – stockinette stitch
ttbl – through the back loop
WS – wrong side of work
wyib – with yarn in back
wyif – with yarn in front
Pattern
Neck (working flat)
With US size 7/4.5mm (24 in/60 cm) circular needles, CO 44 (46, 50, 50, 52, 50) (52, 54, 64, 60, 62) (74, 74, 70, 74, 74) 80 sts using the long tail method.
Row 1 (RS): k2, pm, k6 (6, 6, 6, 6, 6) (6, 8, 12, 10, 10) (16, 16, 14, 16, 16) 18, pm, k28 (30, 34, 34, 36, 34) (36, 34, 36, 36, 38) (38, 38, 38, 38, 38) 40, pm, k6 (6, 6, 6, 6, 6) (6, 8, 12, 10, 10) (16, 16, 14, 16, 16) 18, place a unique BOR marker, k2. Do not join.
Row 2 (WS): Purl to end of row, slipping markers as you come to them.
Row 3: k1, M1R, sl 1, sm, M1L, k to marker, M1R, sm, sl 1, M1L, k to 1 st before marker, M1R, sl 1, sm, M1L, k to marker, M1R, sm, sl 1, M1L, k1. [8 sts increased]
Row 4: Purl to end of row, slipping markers as you come to them.
Row 5: CO 0 (0, 0, 0, 0, 2) (2, 2, 2, 2, 2) (2, 2, 2, 2, 2) 2 sts using the cable cast on method, k to 1 st before marker, M1R, sl 1, sm, M1L, k to marker, M1R, sm, sl 1, M1L, k to 1 st before marker, M1R, sl 1, sm, M1L, k to marker, M1R, sm, sl 1, M1L, k to end. [8 (8, 8, 8, 8, 10) (10, 10, 10, 10, 10) (10, 10, 10, 10, 10) 10 sts increased]
Row 6: CO 0 (0, 0, 0, 0, 2) (2, 2, 2, 2, 2) (2, 2, 2, 2, 2) 2 sts using the cable cast on method, purl to end of row, slipping markers as you come to them. [0 (0, 0, 0, 0, 2) (2, 2, 2, 2, 2) (2, 2, 2, 2, 2) 2 sts increased]
Row 7: CO 2 sts using the cable cast on method, k to 1 st before marker, M1R, sl 1, sm, M1L, k to marker, M1R, sm, sl 1, M1L, k to 1 st before marker, M1R, sl 1, sm, M1L, k to marker, M1R, sm, sl 1, M1L, k to end. [10 sts increased]
Row 8: CO 2 sts using the cable cast on method, purl to end of row, slipping markers as you come to them. [2 sts increased]
Row 9: CO 2 (2, 4, 4, 4, 4) (4, 4, 4, 4, 4) (4, 4, 4, 4, 4) 4 sts using the cable cast on method, k to 1 st before marker, M1R, sl 1, sm, M1L, k to marker, M1R, sm, sl 1, M1L, k to 1 st before marker, M1R, sl 1, sm, M1L, k to marker, M1R, sm, sl 1, M1L, k to end. [10 (10, 12, 12, 12, 12) (12, 12, 12, 12, 12) (12, 12, 12, 12, 12) 12 sts increased]
Row 10: CO 2 (2, 4, 4, 4, 4) (4, 4, 4, 4, 4) (4, 4, 4, 4, 4) 4
sts using the cable cast on method, purl to end of row, slipping markers as you come to them. [2 (2, 4, 4, 4, 4) (4, 4, 4, 4, 4) (4, 4, 4 , 4, 4) 4 sts increased]
Row 11: CO 4 (4, 4, 4, 4, 4) (4, 4, 4, 4, 4) (4, 5, 4, 5, 5) 6 sts using the cable cast on method, k to 1 st before marker, M1R, sl 1, sm, M1L, k to marker, M1R, sm, sl 1, M1L, k to 1 st before marker, M1R, sl 1, sm, M1L, k to marker, M1R, sm, sl 1, M1L, k to end. [12 (12, 12, 12, 12, 12) (12, 12, 12, 12, 12) (12, 13, 12, 13, 13) 14 sts increased]
Row 12: CO 4 (4, 4, 4, 4, 4) (4, 4, 4, 4, 4) (4, 5, 4, 5, 5) 6 sts using the cable cast on method, purl to end of row, slipping markers as you come to them. [4 (4, 4, 4, 4, 4) (4, 4, 4, 4, 4) (4, 5, 4, 5, 5) 6 sts increased]
Row 13: CO 8 (10, 10, 10, 12, 6) (8, 6, 8, 8 , 10) (10, 8, 10, 8, 8) 8 sts using the cable cast on method, k to 1 st before marker, M1R, sl 1, sm, M1L, k to marker, M1R, sm, sl 1, M1L, k to 1 st before marker, M1R, sl 1, sm, M1L, k to marker, M1R, sm, sl 1, M1L, k to end. [16 (18, 18, 18, 20, 14) (16, 14, 16, 16, 18) (18, 16, 18, 16, 16) 16 sts increased]

Join in the round
Knit around to BOR marker, slipping markers as you come to them. The BOR marker is now the start of the round.
Round 14 (RS): Sl 1, M1L, k to 1 st before marker, M1R, sl 1, sm, M1L, k to next marker, M1R, sm, sl 1, M1L, k to 1 st before marker, M1R, sl 1, sm, M1L, k to marker, M1R. [8 sts increased]
Round 15: Knit around, slipping markers as you come to them.
Repeat rounds 14 and 15 until the st count is as follows:

Sizes 1-3: Continue to divide for sleeves.
Sizes 4 (5, 6, 7, 8, 9) (10, 11, 12, 13, 14) (15, 16, 17):
Next round: Sl 1, M1L, k2, M1R, k to 3 sts before m, M1L, k2, M1R, sl 1, sm, M1L, k to m, M1R, sm, sl 1, M1L, k2, M1R, k to 3 sts before m, M1L, k2, M1R, sl 1, sm, M1L, k to marker, M1R. [12 sts increased]
Next round: Knit around, slipping markers as you come to them.
Repeat previous two rounds 1 (1, 2, 2, 2, 3) (3, 3, 3, 3, 3) (4, 5, 5) times more.
Sizes 4-5: Continue to divide for sleeves.
Sizes 6 (7, 8, 9, 10, 11) (12, 13, 14, 15, 16) 17:
Next round: Sl 1, M1L, k2, M1R, k2, M1R, k to 5 sts before m, M1L, k2, M1L, k2, M1R, sl 1, sm, M1L, k to m, M1R, sm, sl 1, M1L, k2, M1R, k2, M1R, k to 5 sts before m, M1L, k2, M1L, k2, M1R, sl 1, sm, M1L, k to marker, M1R. [16 sts increased]
Sizes 6-7: Continue to divide for sleeves.
Sizes 8 (9, 10, 11, 12, 13) (14, 15, 16, 17):
Next round: Knit around, slipping markers as you come to them.
Rep previous 2 rounds 0 (0, 1, 1, 1, 2) (3, 3, 3, 4) times more.
Next round: Sl 1, M1L, k2, M1R, k2, M1R, k to 5 sts before m, M1L, k2, M1L, k2, M1R, sl 1, sm, M1L, k to m, M1R, sm, sl 1, M1L, k2, M1R, k2, M1R, k to 5 sts before m, M1L, k2, M1L, k2, M1R, sl 1, sm, M1L, k to marker, M1R. [16 sts increased]
Divide for sleeves (all sizes)
Knit across front section to 1st marker, remove marker and place 56 (56, 56, 58, 58, 60) (60, 64, 68, 68, 68) (76, 76, 76, 84, 90) 96 sleeve sts onto waste yarn, remove next marker, CO 0 (2, 2, 2, 2, 2) (4, 4, 4, 6, 6) (6, 6, 6, 8, 8) 8 sts using the backwards loop cast on, continue knitting across the back section to next marker. Remove marker and place 56 (56, 56, 58, 58, 60) (60, 64, 68, 68, 68) (76, 76, 76, 84, 90) 96 sleeve sts onto waste yarn. Remove next marker, CO 0 (2, 2, 2, 2, 2) (4, 4, 4, 6, 6) (6, 6, 6, 8, 8) 8 sts using the backwards loop cast on.

Body
Continue knitting the body in St st until the body measures 9 (9, 9, 9.5, 10, 10) (10, 10, 10, 11, 11) (11, 11, 11, 11.5, 12) 12 in/23 (23, 23, 24, 25.5 25.5) (25.5, 25.5, 25.5, 28, 28) (28, 28, 28, 29, 30.5) 30.5 cm from the underarm, or until 4 inches less than desired length.
Applied hem
Next round: k52 (55, 57, 61, 63, 67) (69, 72, 75, 80, 81) (83, 85, 89, 96, 101) 108 sts. Change to US 5/3.75 mm needles. Cast on 18 sts onto left needle using the cable cast on method. You will now be working the hem flat at a 90 degree angle to the body, binding off one live sweater stitch every right side row.
Setup row (RS): Sl1p wyib, (p1, k1) x 8, p1, ssk. Turn work. [19 sts on needle]
Row 1 (WS) – begin working in fisherman’s rib: Sl1p ttbl wyif, (k1b, p1) x 9.
Row 2 (RS): Sl1p wyib, (p1, k1b) x 8, p1, ssk.
Repeat rows 1-2 until all live sweater stitches are bound off. Bind off hem stitches in rib.
Hem twist (see video)
With wrong side facing, fold hem in half. Sandwich hem ends together, and seam through all four layers.
Sleeves
Place 56 (56, 56, 58, 58, 60) (60, 64, 68, 68, 68) (76, 76, 76, 84, 90) 96 sleeve sts from waste yarn onto US 7/4.50 mm needles (double-pointed or magic loop may be used).
Pick up and knit 0 (2, 2, 2, 2, 2) (4, 4, 4, 6, 6) (6, 6, 6, 8, 8) 8 sts from the underarm edge, placing a stitch marker in the center of the underarm sts. [56 (58, 58, 60, 60, 62) (64, 68, 72, 74, 74) (82, 82, 82, 92, 98) 104 sts]
Work in St st, knitting every round, for 2.25 (2, 2, 1.75, 2.25, 2) (1.75, 1.75, 1.75, 1.5, 1.5) (1.5, 1.5, 1.5, 1.25, 1) 1 in/5.5 (5, 5, 4.5, 5.5, 5) (4.5, 4.5, 4.5, 4, 4) (4, 4, 4, 3, 2.5) 2.5 cm.
Next round (decrease round): K2, k2tog, k to 4 sts before m, ssk, k2. [2 sts decreased]
Continue working in St st, working a decrease round as established every 2.25 (2, 2, 1.75, 2.25, 2) (1.75, 1.75, 1.75, 1.5, 1.5) (1.5, 1.5, 1.5, 1.25, 1) 1 in/5.5 (5, 5, 4.5, 5.5, 5) (4.5, 4.5, 4.5, 4, 4) (4, 4, 4, 3, 2.5) 2.5 cm until sleeve measures 18 in/45.5 cm (or until 2 in/5 cm less than desired length) and there are 40 (40, 40, 40, 44, 44) (44, 48, 52, 52, 52) (60, 60, 60, 64, 64) 66 sts remaining.
Change to US 6/4 mm needles. Work in k1, p1 rib until cuff measures 2 in/5 cm. Bind off all sts using a tubular bind off (see video).
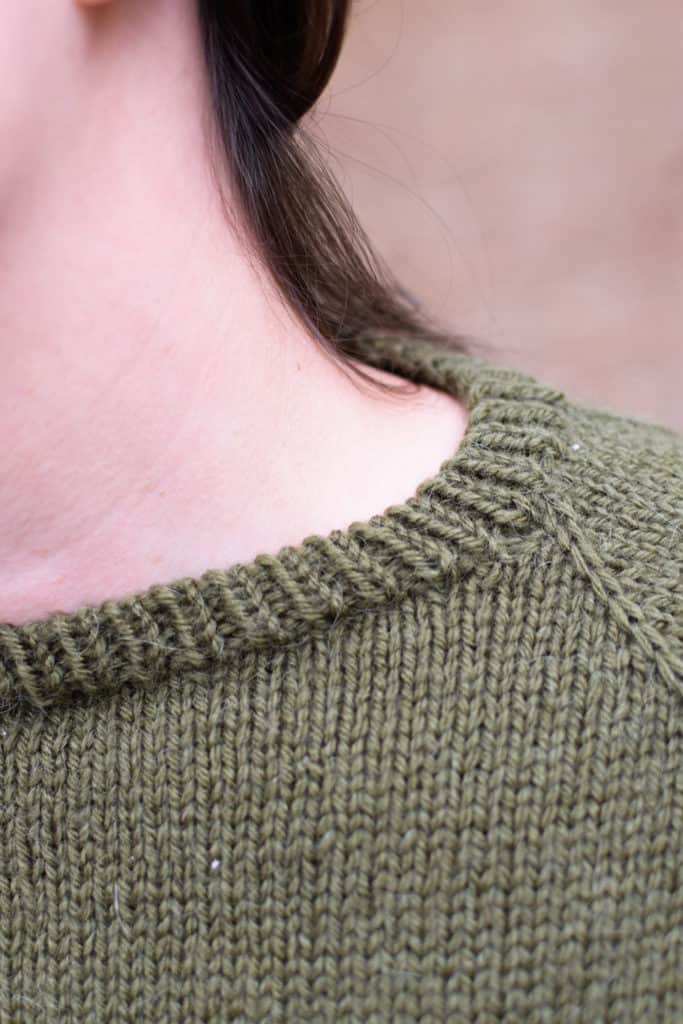
Neckline
With US 6/4 mm needles, pick up and knit sts around the neckline. Pick up one st for every cast on edge st, and 3 sts for every 4 vertical rows, ending with a multiple of two (see video).
Place a marker, and work in k1, p1 rib for 1 in/2.5 cm. Bind off all sts using a tubular bind off.
Weave in all ends and block.


I hope you enjoy this pattern! Feel free to share with your friends by pinning the image below, and be sure to tag me and #raglanwithatwist on Instagram!