yarnspirations

Bernat Pipsqueak Stripes

Click for a yarn review of Bernat Pipsqueak Stripes and the Cloud Nine Baby Blanket - a free pattern from Yarnspirations. #knittingpattern #yarnspirations #babyblanket

*This post contains sponsored content. All opinions are my own.

Bernat Pipsqueak Stripes

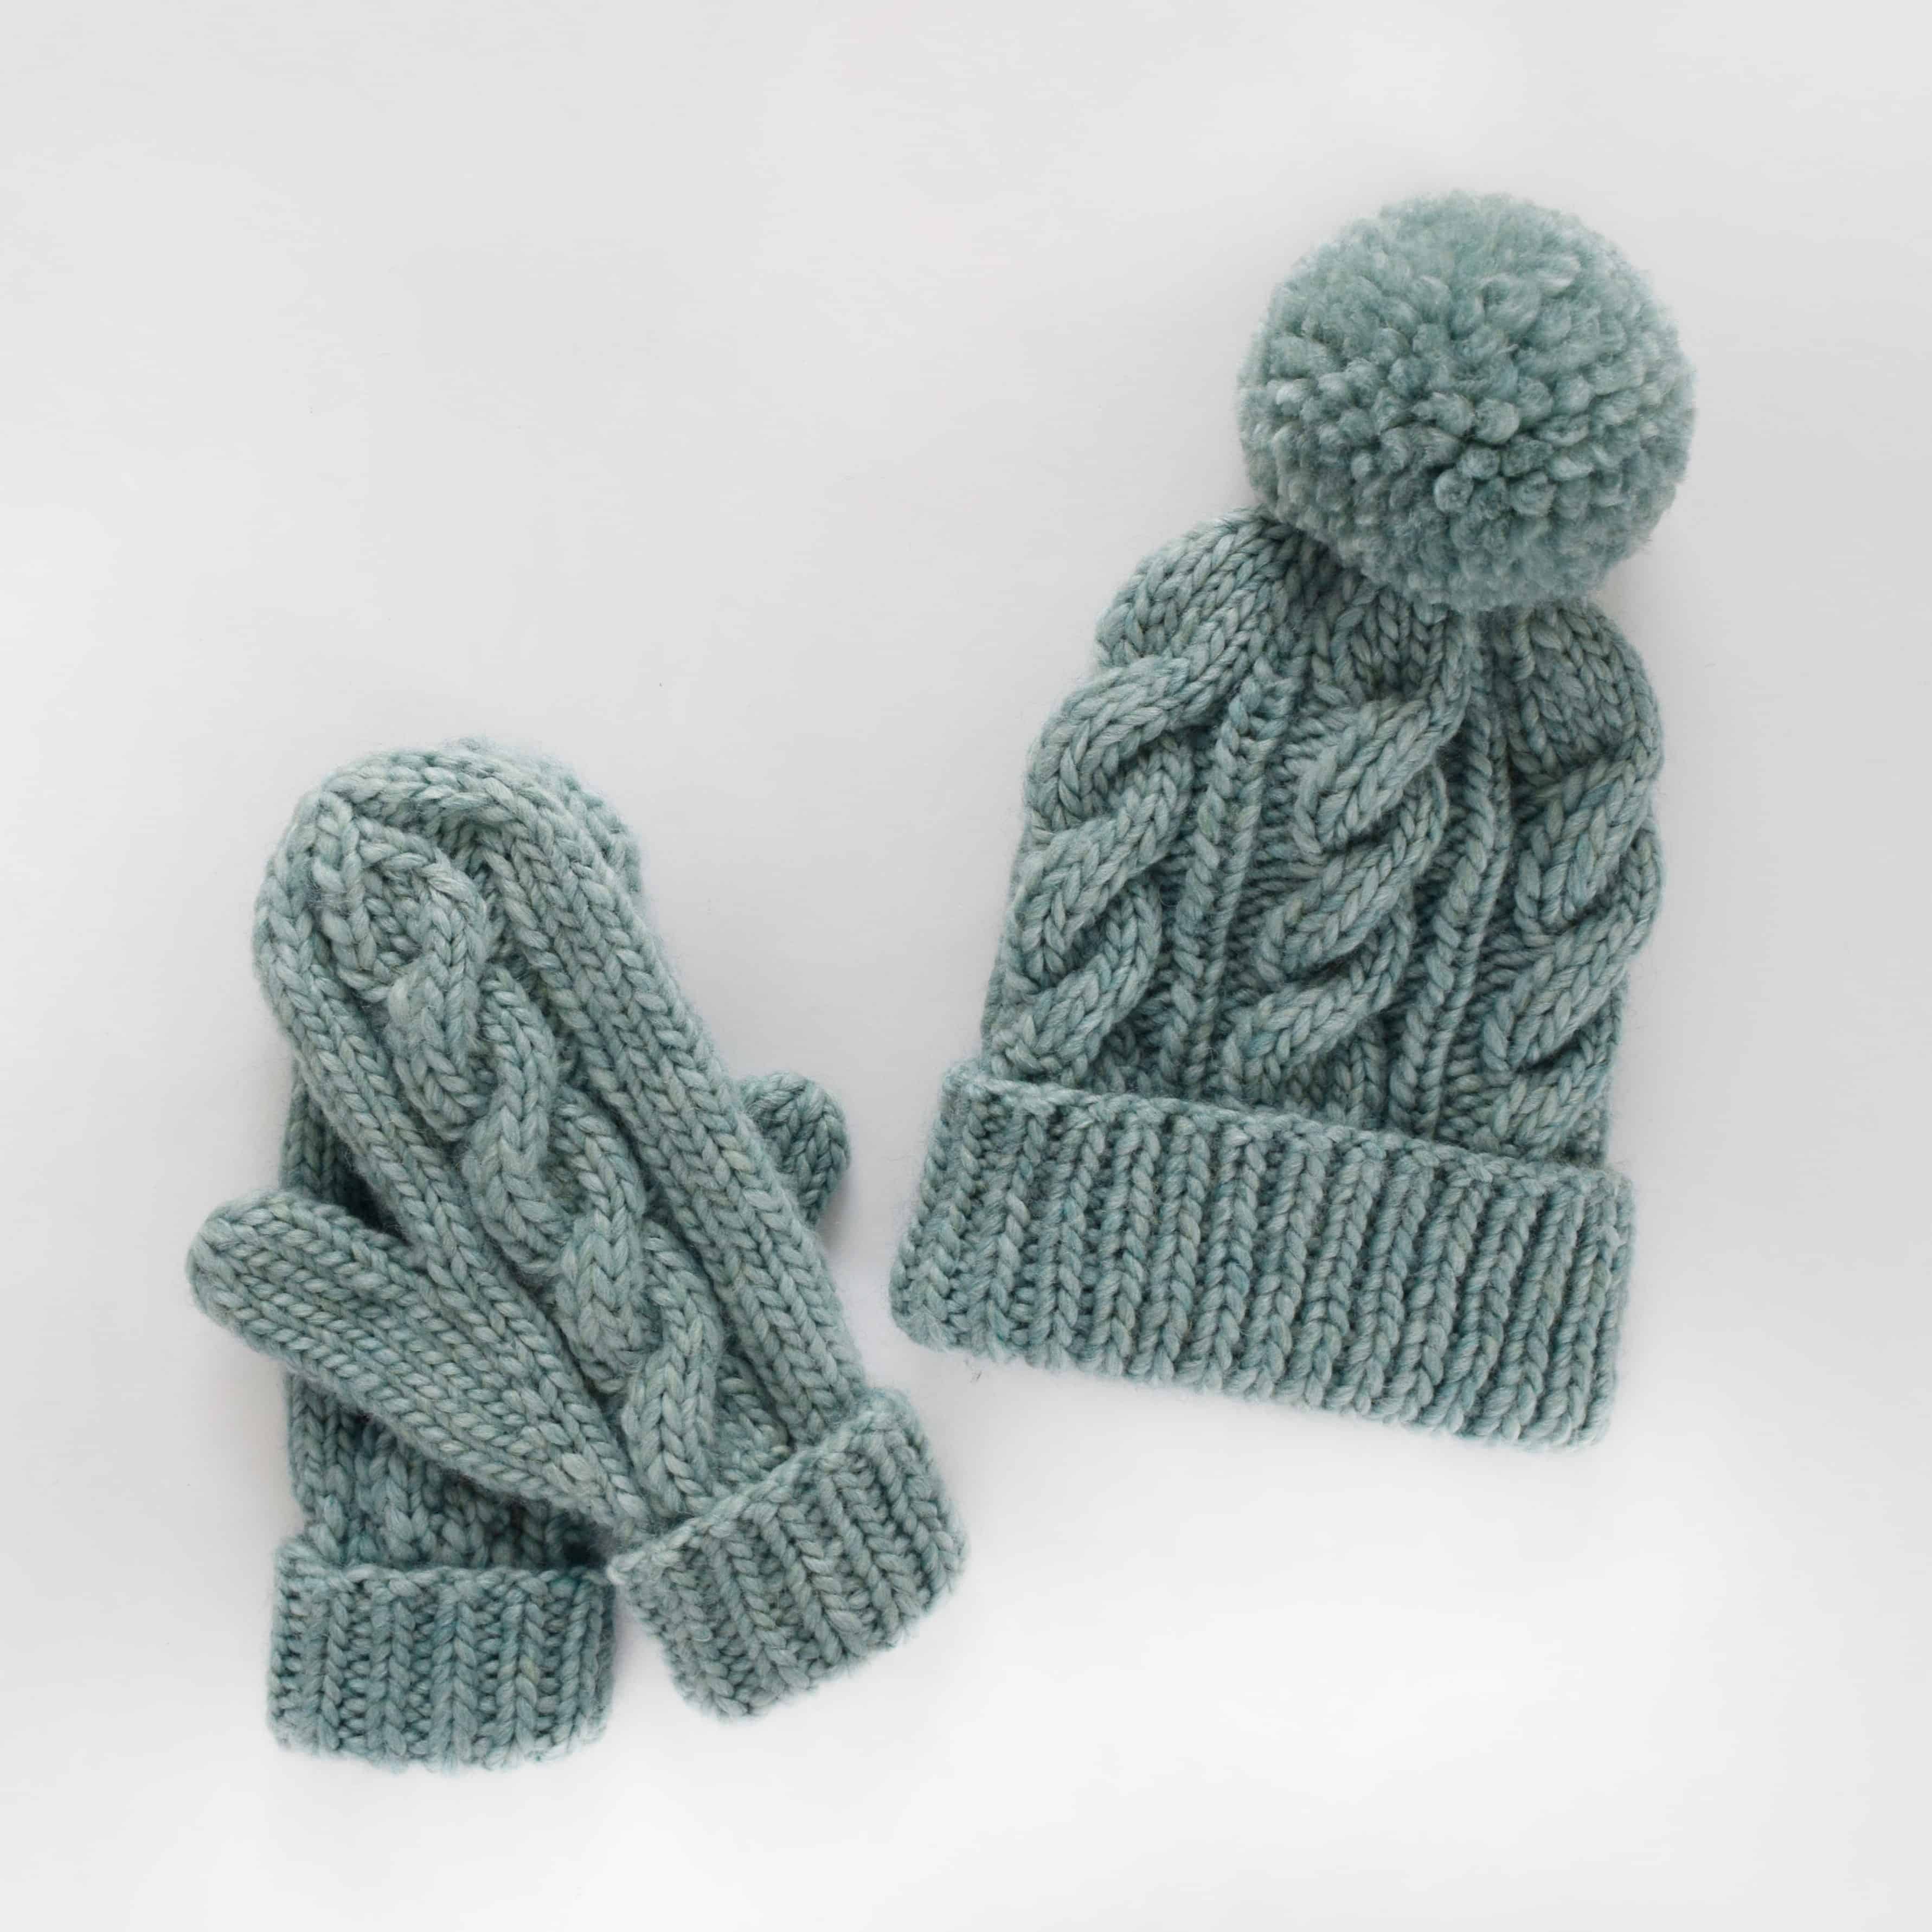
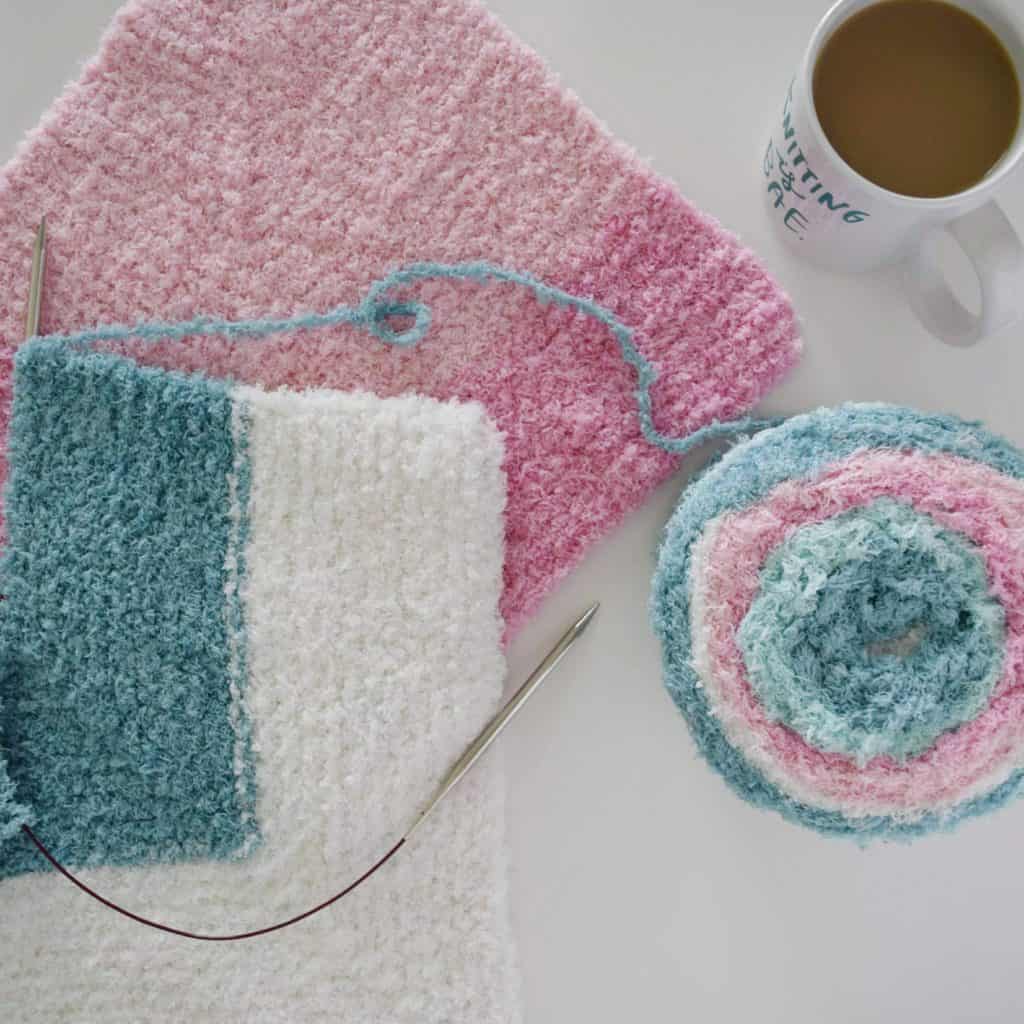
Hey guys! I hope your weekend is off to a great start and you’re getting some quality knitting time in. I’m working on this super cute, super simple baby blanket with a brand new yarn from Yarnspirations! They’ve partnered with Walmart to bring us a new self striping yarn cake – Bernat Pipsqueak Stripes!

Click for a yarn review of Bernat Pipsqueak Stripes and the Cloud Nine Baby Blanket - a free pattern from Yarnspirations. #knittingpattern #yarnspirations #babyblanket

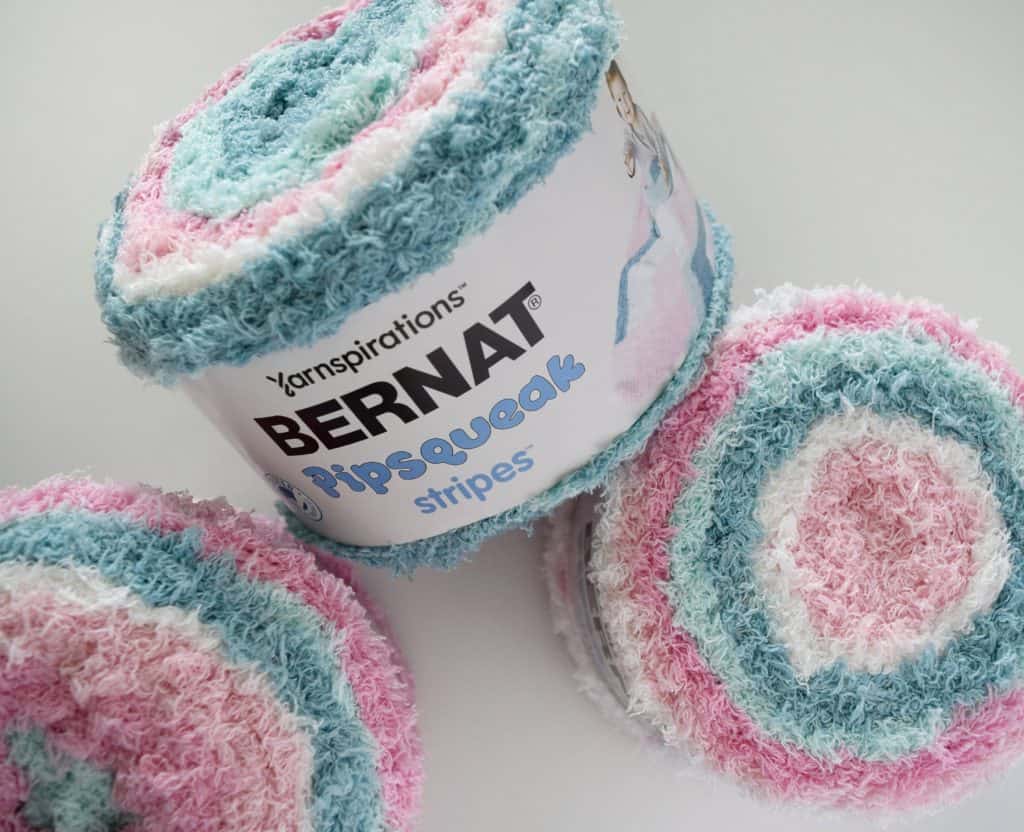
Bernat Pipsqueak Stripes is a fuzzy, textured baby yarn. It’s great for baby projects because it’s super soft and machine washable/dryable! It’s Oeko-tex certified, tested for harmful substances and proven to be safe for baby’s sensitive skin. It’s 100% polyester, and a category #5 bulky yarn. Each cake is 9.8 oz/280 g and 284 yds/260 m.

Click for a yarn review of Bernat Pipsqueak Stripes and the Cloud Nine Baby Blanket - a free pattern from Yarnspirations. #knittingpattern #yarnspirations #babyblanket

How great is this color? I love the light pink hues and teal together. See all the available colors here. I chose the color Playdate for my blanket.

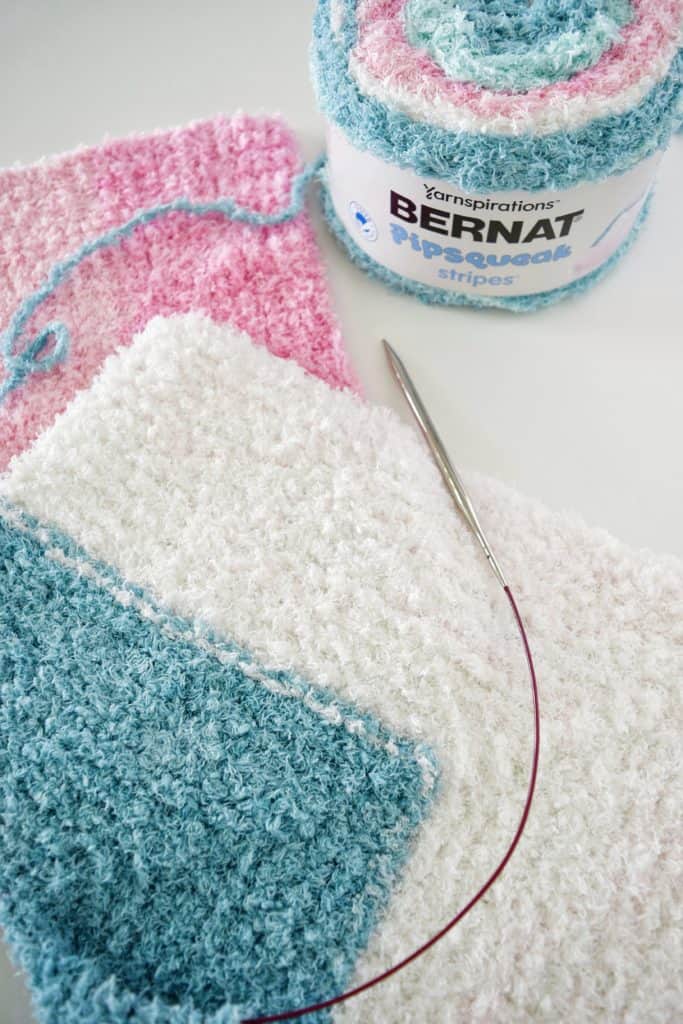
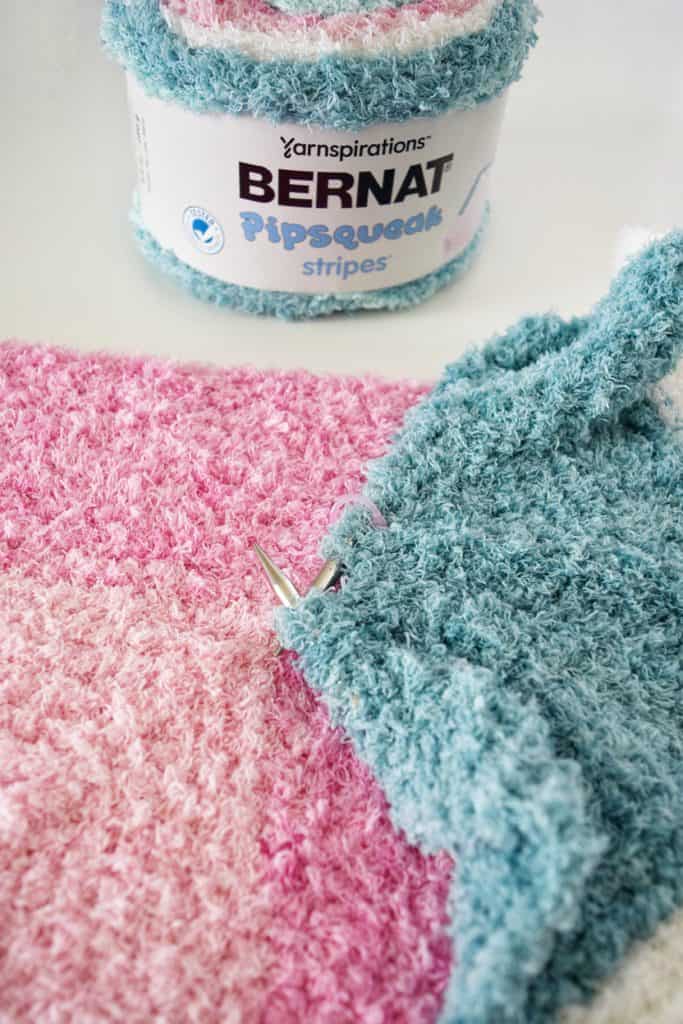
I’m knitting the Cloud Nine Knit Baby Blanket, which is a free pattern from Yarnspirations. It calls for 3 cakes, and you simply knit 9 separate squares and then seam them together!

These are mitered squares, which means they are worked diagonally from corner to corner. You’ll work a decrease in the center of each square until just a few stitches remain. Helpful tip: the stitches can be difficult to see since this is a fuzzy yarn, so I’m using a stitch marker in the center of my square to keep track of when to decrease.

Click for a yarn review of Bernat Pipsqueak Stripes and the Cloud Nine Baby Blanket - a free pattern from Yarnspirations. #knittingpattern #yarnspirations #babyblanket

During the 2nd row, I knit 34, placed a marker, then worked a center decrease (slip 2 stitches together knitwise, k1, pass the slipped stitches over). Then during the 4th row (and all decrease rows), I knit until 1 stitch remains before the marker, slip the next stitch from the left to the right needle, remove marker, slip the stitch from the right needle back to the left, replace marker, then work the center decrease. The decrease rows are alternated with plain knit rows, so it’s really a very simple pattern that results in a beautiful blanket.

Click for a yarn review of Bernat Pipsqueak Stripes and the Cloud Nine Baby Blanket - a free pattern from Yarnspirations. #knittingpattern #yarnspirations #babyblanket

Well, I’m off to finish up this square and start on the next! Remember, you can find Bernat Pipsqueak Stripes in stores or online at walmart.com. I hope you enjoy it, and the rest of your weekend!

Caron x Pantone Fair Isle Beanie – Free Pattern

Fair Isle Beanie - Click for the free knitting pattern from www.kniftyknittings.com! #knittingpattern #yarnspirations #caronxpantone

*This post contains sponsored content. All opinions are my own.

Caron x Pantone

Hello knitters! I’m popping in today with a new free pattern for you, and to tell you about this gorgeous yarn I received from Yarnspirations!

I was thrilled when Yarnspirations reached out to see if I’d like to try their newest yarn: Caron x Pantone. Of course I said heck yes!

This yarn is a collaboration between Caron and Pantone (hence the name!), and it’s just perfect for color work. The color combinations are out of this world, from gradient blues to intense pops of color.

See all of the colorways offered here. Play around with Yarnspirations new Color Play Tool! You can take any Caron x Pantone pattern and click around to see how it would look in different color combinations to find the perfect one for you.

Fair Isle Beanie - Click for the free knitting pattern from www.kniftyknittings.com! #knittingpattern #yarnspirations #caronxpantone

I chose the Moody Pumpkins colorway – it’s perfect for fall with that pop of pumpkin. I decided to knit my hat in the same order the hank came in, though you can mix and match and find what works for you!

Each 100 gram hank is made up of 5 individual links, or mini skeins. You simply separate the links, and wind them into balls.

The yarn is 60% acrylic, 20% merino wool and 20% nylon. It is incredibly soft and has so much drape. You can purchase it in-store or online at Michaels or Yarnspirations.

Watch this video from The Crochet Crowd to see just how easy it is to take apart and wind the hanks!


There are 20 free patterns on Yarnspirations.com created just for this yarn, which you can find here!

On to the pattern

Click for the ad-free PDF

Click to queue on Ravelry

Here’s what you’ll need:

Yarn

2 hanks of Caron x Pantone in Moody Pumpkins (bulky weight no. 5):
41 yds/38 m Coffee Bean
14 yds/13 m Dress Blues

14 yds/13 m Lyons Blue
14 yds/13 m Lapis
46 yds/42 m Pumpkin Spice

Needles

US 9/5.5 mm 16 in circular needle
US 10/6.0 mm 16 in circular needle
US 10/6.0 mm double pointed needles
(or size needed to obtain gauge)

Notions

Stitch marker
Tapestry needle for weaving in ends
Pom Pom Maker – Clover large 3 ⅜ in

Gauge

16 sts and 19 rounds = 4in/10cm in Stockinette st with larger needles

Size

Adult – to fit 21-23 in head circumference

Abbreviations

CC1 – contrasting color 1
CC2 – contrasting color 2
CC3 – contrasting color 3
CC4 – contrasting color 4
CO – cast on
k – knit

k2tog – knit 2 together
MC – main color
p – purl
pm – place marker
st(s) – stitch(es)
St st – Stockinette stitch


Fair Isle Beanie - Click for the free knitting pattern from www.kniftyknittings.com! #knittingpattern #yarnspirations #caronxpantone

Pattern
Brim:

With MC and US size 9/5.5 mm circular needle, CO 72 sts. Pm and join in the round, being careful not to twist sts. Work in k1, p1 rib for 8 rounds.

Body:

Switch to US size 10/6.0 mm circular needle. See colorwork chart, or follow written directions below:

Fair Isle Beanie - Click for the free knitting pattern from www.kniftyknittings.com! #knittingpattern #yarnspirations #caronxpantone

Round 1 of colorwork pattern: *k1 with MC, k1 with CC1. Repeat from * end of round.
Round 2: *k1 CC1, k1 MC. Repeat from * to end of round.
Round 3: k around with CC1.
Round 4: *k1 CC1, k1 CC2. Repeat from * end of round.
Round 5: *k1 CC2, k1 CC1. Repeat from * to end of round.

Round 6: k around with CC2.
Round 7: *k1 CC2, k1 CC3. Repeat from * to end of round.
Round 8: *k1 CC3, k1 CC2. Repeat from * to end of round.
Round 9: k around with CC3.
Round 10: *k1 CC3, k1 CC4. Repeat from * to end of round.

Round 11: *k1 CC4, k1 CC3. Repeat from * to end of round.
Round 12: k around with CC4.
Round 13: *k1 CC4, k1 CC3. Repeat from * to end of round.
Round 14: *k1 CC3, k1 CC4. Repeat from * to end of round.
Round 15: k around with CC3.

Round 16: *k1 CC3, k1 CC2. Repeat from * to end of round.
Round 17: *k1 CC2, k1 CC3. Repeat from * to end of round.
Round 18: k around with CC2.
Round 19: *k1 CC2, k1 CC1. Repeat from * to end of round.
Round 20: *k1 CC1, k1 CC2. Repeat from * to end of round.

Round 21: k around with CC1.
Round 22: *k1 CC1, k1 MC. Repeat from * to end of round.
Round 23: *k1 MC, k1 CC1. Repeat from * to end of round.

Fair Isle Beanie - Click for the free knitting pattern from www.kniftyknittings.com! #knittingpattern #yarnspirations #caronxpantone

Decreases:

Switch to dpns when stitches become too tight on circulars. This section is worked entirely with MC.

Round 1: *k7, k2tog. Repeat from * to end of round (8 sts decreased).
Round 2: k around.
Round 3: *k6, k2tog. Repeat from * to end of round.
Round 4: k around.
Round 5: *k5, k2tog. Repeat from * to end of round.
Round 6: k around.

Round 7: *k4, k2tog. Repeat from * to end of round.
Round 8: k around.
Round 9: *k3, k2tog. Repeat from * to end of round.
Round 10: k around.
Round 11: *k2, k2tog. Repeat from * to end of round.
Round 12: k around.
Round 13: *k1, k2tog. Repeat from * to end of round.

Cut yarn, weave tail through remaining 16 sts and draw to close top of hat. Weave in ends and block, if desired.

Pom:

Using a 3 ⅜ in pom pom maker (Clover large), wrap CC4 yarn neatly around both arches of the pom pom maker until full. Insert scissors into space between arches and cut yarn.

Tie a long strand of yarn tightly through the pom pom maker. Remove pom pom maker, and trim pom. Attach pom to top of hat, weave ends back through pom and trim ends.

Fair Isle Beanie - Click for the free knitting pattern from www.kniftyknittings.com! #knittingpattern #yarnspirations #caronxpantone

Thanks to Michaels and Yarnspirations for sponsoring and collaborating on this project! I can’t wait to see what color combinations you come up with. Please feel free to share this pattern with your friends, pin the image below!

Fair Isle Beanie - Click for the free knitting pattern from www.kniftyknittings.com! #knittingpattern #yarnspirations #caronxpantone

Beachcomber Tote – Free Knitting Pattern

Free Knitting Pattern - How to Knit the Beachcomber Tote! Click for the step-by-step video tutorial and knitting pattern, made with Bernat Maker Outdoor yarn! #knitting #knittingpattern #freeknittingpattern #yarnspirations

Who’s ready to hit the beach this summer? My friends at Yarnspirations and JOANN Fabrics and Crafts generously sent along a box of their new outdoor yarn to try – Bernat Maker Outdoor! I immediately thought the nautical themed colors combined with fade resistant yarn would make a perfect beach bag! We have several beach trips planned this summer, and I know this large tote will come in handy. Keep reading for the free knitting pattern for the Beachcomber Tote!

A few things about this new yarn: 

  • It’s the first outdoor yarn of its kind!
  • It’s available only at JOANN stores and www.joann.com
  • You can keep this yarn outside, as it’s fade and mold resistent (hello, outdoor throw pillows!)
  • It’s available in self-striping and coordinating solid colors
Want to win the yarn to make this bag? Yarnspirations is giving away 3 prize packs! Each prize will include:
  • 3 skeins of Bernat Maker Outdoor in solid
  • 3 skeins of Bernat Maker Outdoor in coordinating stripes,
  • Matching napkins
  • Reusable Bernat branded mason jar


Now onto the pattern…
Beachcomber Tote

Click for the ad free pattern PDF

Add to your Ravelry Queue

The Beachcomber Tote is knit from the bottom up, starting with a small rectangle. Stitches are picked up around each side, and the body of the tote is then knit in the round. An applied I-cord bind off gives the tote a clean and sturdy edge, and the addition of grommets keeps the simple rope handles nicely in place.

Free Knitting Pattern - How to Knit the Beachcomber Tote! Click for the step-by-step video tutorial and knitting pattern, made with Bernat Maker Outdoor yarn! #knitting #knittingpattern #freeknittingpattern #yarnspirations

Here’s what you’ll need:

Yarn

50 yds/46 m (1 skein) Bernat Maker Outdoor (Royal Blue)
317 yds/290 m (2 skeins) Bernat Maker Outdoor Stripes (Fresh Royal Blue Stripe)

Needles

US 10/6 mm 32 in circular needles
US 11/8 mm 32 in circular needles

Notions

Locking stitch markers
Yarn needle
½ in grommet kit
2 ½ yds of ⅜ in braided rope trim

Gauge

12 ½ sts and 20 rows = 4 in in Stockinette st with larger needles

Size

One: 16 in wide by 14 in tall when laid flat

Abbreviations

CO – cast on
k – knit
k2tog – knit 2 sts together
pm – place marker
sl – slip
st(s) – stitch(es)
ttbl – through the back loop

The following step-by-step tutorial demonstrates how to:

  • Pick up stitches
  • Create jogless color stripes
  • Mark for handle/grommet placement
  • Knit an applied I-cord bind off
  • Attach grommets and handles


Pattern

Bottom:

With US 10/6 mm needles, CO 50 sts using the long tail method.

Work in garter stitch (knitting every row) until piece measures 4 in wide (about 28 rows).

Switch to US 11/8 mm needles and knit one row.

Rotate the work 90 degrees. Pick up and knit 14 sts in each garter ridge along the short side of the work. Rotate work again and pick up and knit 50 sts along the CO edge of the work. Rotate again and pick up and knit another 14 sts in each garter ridge along the short side of the work (128 sts total on needles).

Body:

Place marker, join a white end of the self-striping yarn and begin knitting in the round.

Please note: each stripe section should be about 6-7 rounds wide. If the first color of the ball does not have enough yardage, you may need to cut the yarn and rejoin to another section of white yarn. See video for further explanation.

Knit every round until there are 9 striped sections total, ending after a white stripe (5 white, 4 blue).

With blue, knit 2 rounds.

Free Knitting Pattern - How to Knit the Beachcomber Tote! Click for the step-by-step video tutorial and knitting pattern, made with Bernat Maker Outdoor yarn! #knitting #knittingpattern #freeknittingpattern #yarnspirations

Grommet marking round:

During this round, 8 locking stitch markers will be placed on the horizontal bar between stitches as indicated. These markers will stay in the knitting (not on the needles) to mark where grommets/handles will be placed. See video for demonstration.

Next round: k6, pm, k38, pm, k8, pm, k10, pm, k8, pm, k38, pm, k8, pm, k10, pm, k2.

Knit two rounds.

I-cord bind off:

CO 3 stitches to the end of the left needle using the knitted cast on (see video).

Bind off round: *k2, k2tog ttbl. Sl 3 sts purlwise from right needle to the left needle. Repeat from * until all stitches are bound off.

Please note: At some point during the bind off you will run out of blue yarn. Rejoin the solid Royal Blue skein and continue.

Sl last 3 sts back to left needle. Cut yarn and seam the remaining 3 sts on the needle to the 3 cast on edge sts (see video).

Weave in remaining ends.

Finishing:

Fold in short ends of the bag, line up stitch markers and pinch together to attach grommets (see video). Make sure to place the right side of the grommet through the front (right side) of the bag.

Cut two 36 ½” lengths of ⅜” braided rope for handles. Apply a small amount of hot glue to the ends of the rope (optional) and let dry. Thread the ropes through the grommets from inside the folds, and tie knots in the ends on the right side of bag (see video).

Click for the ad free PDF

Free Knitting Pattern - How to Knit the Beachcomber Tote! Click for the step-by-step video tutorial and knitting pattern, made with Bernat Maker Outdoor yarn! #knitting #knittingpattern #freeknittingpattern #yarnspirations

And there you have it! I hope you enjoy this pattern, and I hope your Beachcomber Tote follows you on your beach adventures this summer. Don’t forget to enter the giveaway to win all the yarn you need to make this (and then some!), and feel free to share this with your friends by pinning the image below!

Free Knitting Pattern - How to Knit the Beachcomber Tote! Click for the step-by-step video tutorial and knitting pattern, made with Bernat Maker Outdoor yarn! #knitting #knittingpattern #freeknittingpattern #yarnspirations

Fairy Leaves Knit Dress – Free Pattern from Yarnspirations

Fairy Leaves Knit Dress - a free pattern from Yarnspirations!

Fairy Leaves Knit Dress – Free Pattern from Yarnspirations

Have you guys seen the new lookbooks from Yarnspirations? They are full of amazing free patterns! Their Baby’s Day Out lookbook gave me a serious case of baby fever, so I was thrilled when they sent along a kit for their new Fairy Leaves Knit Dress!

How adorable is this little dress? The pattern is available as a free download, or you can purchase it as a kit with all the yarn, needles and notions you need for around $20!

I thought I’d share a few tips I found while knitting this up, so grab your needles and let’s get started!

I used Bernat Softee Baby Yarn in the color Soft Peach. Yarnspirations has generously provided a coupon code for 20% off Bernat Softee Baby from today through May 2nd with the coupon code “KKBERNATSOFTEEBABY” (thanks Yarnspirations)!

I knitted the 6 month size, which calls for two balls of yarn, but I ended up using just under one.

Fair Leaves Knit Dress - Free Pattern from Yarnspirations!

Notes and Tips:
  • The dress is knit in one piece, from the top down.
  • First you’ll be knitting back and forth in rows, then later join to knit in the round.
  • The lace charts are read starting from right to left (even the wrong side rows).
  • The pattern says to join in the round after the 12th row, but you actually want to join after a right side row. I joined after row 13.
  • Once you’re knitting in the round (starting with rnd 14), you’ll be working with the right side facing for every round. So all “-” symbols on the even rounds will now be read as purls, and all the blank squares will be knits.
  • Starting with rnd 14, I knit the last stitch of every even numbered round. The pattern doesn’t specify exactly what to do with the last stitch of the round, but I felt that knitting it would maintain the seed stitch section.
  • For the 30th round, I started with P1, K1 twice, not K1, P1, to maintain the seed stitch section (just as in rnd 14).
  • The sleeve stitches are set aside while the skirt is knit. They are later knit flat, though you could also join and knit them in the round using the magic loop method (pictured below).

Fairy Leaves Knit Dress - Free Pattern from Yarnspirations

Fairy Leaves Knit Dress - Free Pattern from Yarnspirations!

Fairy Leaves Knit Dress - Free Pattern from Yarnspirations!

That’s all there is to it! I’m sure you will love knitting this pattern for the little cutie in your life.

Remember, you can save 20% on Bernat Softee Baby from now until May 2nd with the code “KKBERNATSOFTEEBABY”!

Which color will you knit this in? Feel free to share with your friends – pin the image below!

Fairy Leaves Knit Dress - Free Pattern from Yarnspirations! #knitting #knittingpattern #freeknittingpattern

Classic Cabled Hat & Mittens – Free Pattern

Classic Cabled Hat & Mittens – Free Pattern

Friends, I’m so excited to share this new free pattern with you! I’m thrilled to be collaborating with the wonderful people at Yarnspirations for this pattern set.

I used their super soft Bernat Roving, a single ply wool/acrylic blend! You can find it here, and Yarnspirations has generously provided a coupon code for 20% off from March 13th to 19th with the code KNIFTYBERNATROVING20 – thank you Yarnspirations!

This cozy hat and mitten set features a classic cable pattern with alternating cable sections for added interest. The fold over brim provides a little extra warmth, while allowing for an adjustable fit.

You can find the printable ad-free version of the pattern here.

Save it for later to your Ravelry queue here.

Feel free to share with your friends, and pin the image below!

Please see the following Tips & Tricks video for help with increases, decreases, how to C6B (cable 6 back) with and without a cable needle, and how to separate the thumb from the body of the mitten.

Click here for my magic loop tutorial.

Click here for my pom pom tutorial.

Yarn

232 yds/212 m (2 skeins) Bernat Roving (shown in Low Tide)
129 yds/119 m for hat
103 yds/93 m for mittens
*or similar bulky weight category 5 yarn

Needles

US 10.5/6.5 mm 16 in circular needle (or 40 in for magic loop method)
US 10.5/6.5 mm double pointed needles (optional – not necessary with magic loop method)

Please note: for a slouchier/less snug hat fit, or for head sizes larger than 22 in, use US 11/8.0 mm needles (hat only)

Notions

Stitch markers
Cable needle
Tapestry needle for weaving in ends
Pom pom maker – Clover Extra Large 4 ½ in (optional)
Scrap yarn or stitch holder

Gauge

13 sts and 18 rounds = 4in/10cm in Stockinette st with US 10.5/6.5 mm needles, or size needed to obtain gauge

Size

One – Women’s medium
To fit head circumference 21-22 in, hand circumference 7 ½ in and hand length 7 in

Abbreviations (see Tips and Tricks video for assistance with these techniques)

CDD – centered double decrease: slip 2 sitches together knitwise, knit 1, pass slipped stitches over.
cn – cable needle
CO – cast on
C6B – cable 6 back. Sl 3 sts to cn at back, k3, k3 from cn.
k – knit
k2tog – knit 2 together

m1L – make 1 left: lift horizontal bar between sts from front with left needle, k into back of loop.
m1R – make 1 right: lift horizontal bar between sts from back with left needle, k into front of loop
p – purl
pm – place marker
p2tog – purl 2 together
sl m – slip marker: move marker from left needle to right
ssk – slip, slip, knit slipped sts together
st(s) – stitch(es)

Hat

Brim:

With US 10.5/6.5 mm needles, CO 60 sts. Pm and join in the round, being careful not to twist sts. Work in k1, p1 rib for 6 in.

Body:

Increase round:
Round 1: *p2, k1, p2, k3, m1L, k2. Repeat from * to end of round. {66 sts on needles}

Refer to chart (or follow written directions below).

Round 2: *p2, k1, p2, k6. Repeat from * to end of round.
Round 3: Repeat round 2.
Round 4 (cable round A): *p2, k1, p2, C6B, p2, k1, p2, k6. Repeat from * to end of round.
Rounds 5-6: Repeat round 2.
Round 7 (cable round B): *p2, k1, p2, k6, p2, k1, p2, C6B. Repeat from * to end of round.

Round 8-10: Repeat round 2.
Round 11 (cable round A): Repeat round 4.
Round 12-13: Repeat round 2.
Round 14 (cable round B): Repeat round 7.

Repeat rounds 8-14 once more (twice more for a slouchier fit).

Repeat round 2 twice more.

Decreases:

Use the magic loop method or divide sts over dpns when sts become too tight on circulars.

Decrease round 1: *p2tog, k1, p2tog, ssk, k2, k2tog, p2, k1, p2, k6. Repeat from * to end of round.
Round 2: *p1, k1, p1, k4, p2tog, k1, p2tog, ssk, k2, k2tog. Repeat from * to end of round.

Round 3: *p1, k1, p1, ssk, k2tog, p1, k1, p1, k4. Repeat from * to end of round.
Round 4: *p1, k1, p1, k2, p1, k1, p1, ssk, k2tog. Repeat from * to end of round.
Round 5: *CDD, k2tog. Repeat from * to end of round.

Cut yarn, leaving an 8 in tail. Weave tail through remaining 12 sts and draw to close top of hat. Weave in ends and block if desired.

Pom (optional):

With a 4 ½ in pom pom maker, wrap yarn around 7-8 times each side for a nice full pom. Attach pom to top of hat, weave ends back through pom and trim ends. Click here for my pom pom tutorial!

Right Mitten

Cuff:

Please note: Instructions are written with the magic loop method in mind (double pointed needles may also be used by dividing stitches evenly over 4 needles).

“Turn work” simply means to turn the mitten around to work the stitches on the other half of the mitten.

Using the magic loop method, CO 24 sts with the long tail method. Pull the cable halfway between the stitches and join in the round, being careful not to twist sts. Place a locking stitch marker to mark the beginning of the round.

Starting with a purl st, work in p1, k1 rib for 4 ½ in.

Round 1: k2, p2, k3, m1L, k2, p2, k1, m1R, turn work, k11, m1L, k1. {27 sts on needles}
Round 2: k2, p2, k6, p2, k2, turn work, k13.
Round 3: Repeat round 2.

Thumb Gusset:

Round 4: k2, p2, k6, p2, k2, pm, m1R, turn work, k1, m1L, pm, k12. {2 sts increased}
Round 5: k2, p2, k6, p2, k2, sl m, k to next marker, sl m, k12.
Round 6: k2, p2, k6, p2, k2, sl m, m1R, k to next marker, m1L, sl m, k12.
Round 7 (cable round): k2, p2, C6B, p2, k2, sl m, k to next marker, sl m, k12.
Round 8: Repeat round 6.
Round 9: Repeat round 5.
Round 10: Repeat round 6.

Rounds 11-13: Repeat round 5.
Round 14 (cable round): Repeat round 7.
Round 15: Repeat round 5
Round 16: k2, p2, k6, p2, k2, remove marker, place 9 gusset sts on scrap yarn, turn work and remove next marker. Cast on 1 st using the backwards loop cast on, k 12. {14 sts on front (cable side) needle, 13 sts on back needle}

Refer to chart (or follow written directions below).

Round 17: k2, p2, k6, p2, k2, turn work, k13.
Rounds 18-20: Repeat round 17.
Round 21 (cable round): k2, p2, C6B, p2, k2, turn work, k13.
Rounds 22-27: Repeat round 17.
Round 28 (cable round): Repeat round 21.
Rounds 29-31: Repeat round 17.

Decreases:

Round 32: k2, p2, ssk, k2, k2tog, p2, k2, turn work, k13.
Round 33: ssk, p2, k4, p2, k2tog, turn work, ssk, k to last 2 sts, k2tog.
Round 34: k1, p2, ssk, k2tog, p2, k1, turn work, ssk, k to last 2 sts, k2tog.

Round 35: ssk, p1, k2, p1, k2tog, turn work, ssk, k to last 2 sts, k2tog.
Round 36: k1, p1, k2tog, p1, k1, turn work, ssk, k to last 2 sts, k2tog.
Round 37: *ssk, k1, k2tog. Repeat from * once more.

Cut yarn, leaving an 8 in tail. Weave tail through remaining 6 sts and draw to close top of mitten.

Thumb:

Place 9 sts from scrap yarn onto needles. Pick up and knit 1 st from the cast on st edge. Place a locking stitch marker under the picked up st to mark the beginning of the round.

Work in Stockinette st for 2 ¼ in.

Decrease round: *ssk, k1, k2tog. Repeat from * once more.

Cut yarn, weave tail through remaining 6 sts and draw to close top of thumb.

Turn mitten inside out and weave in all ends. Use the tail end from the picked up st to close the gap near the base of the thumb. Block, if desired.

Left Mitten

Cuff:

Repeat as for right mitten: CO 24 sts and work in p1, k1 rib for 4 ½ in.

Round 1: k11, m1R, k1, turn work, k2, p2, k3, m1L, k2, p2, k1, m1L. {27 sts on needles}
Round 2: k13, turn work, k2, p2, k6, p2, k2.
Round 3: Repeat round 2.

Thumb Gusset:

Round 4: k12, pm, m1R, k1, turn work, m1L, pm, k2, p2, k6, p2, k2. {2 sts increased}
Round 5: k12, sl m, k to next marker, sl m, k2, p2, k6, p2, k2.
Round 6: k12, sl m, m1R, k to next marker, m1L, sl m, k2, p2, k6, p2, k2..
Round 7 (cable round): k12, sl m, k to next marker, sl m, k2, p2, C6B, p2, k2.
Round 8: Repeat round 6.
Round 9: Repeat round 5.

Round 10: Repeat round 6.
Rounds 11-13: Repeat round 5.
Round 14 (cable round): Repeat round 7.
Round 15: Repeat round 5
Round 16: k12, remove marker, place 9 gusset sts on scrap yarn and cast on 1 st using the backwards loop cast on. Turn work and remove next marker, k2, p2, k6, p2, k2. {13 sts on front needle, 14 sts on back (cable side) needle}

Refer to chart (or follow written directions below).

Round 17: k13, turn work, k2, p2, k6, p2, k2.
Rounds 18-20: Repeat round 17.
Round 21 (cable round): k13, turn work, k2, p2, C6B, p2, k2.

Rounds 22-27: Repeat round 17.
Round 28 (cable round): Repeat round 21.
Rounds 29-31: Repeat round 17.

Decreases:

Round 32: k13, turn work, k2, p2, ssk, k2, k2tog, p2, k2.
Round 33: ssk, k9, k2tog, turn work, ssk, p2, k4, p2, k2tog.
Round 34: ssk, k7, k2tog, turn work, k1, p2, ssk, k2tog, p2, k1.
Round 35: ssk, k5, k2tog, turn work, ssk, p1, k2, p1, k2tog.
Round 36: ssk, k3, k2tog, turn work, k1, p1, k2tog, p1, k1.
Round 37: *ssk, k1, k2tog. Repeat from * once more.

Cut yarn, leaving an 8 in tail. Weave tail through remaining 6 sts and draw to close top of mitten.

Thumb:

Repeat as for right mitten thumb.

Turn mitten inside out and weave in all ends. Use the tail end from the picked up st to close the gap near the base of the thumb. Block, if desired.

I hope you’ve enjoyed this pattern as much as I enjoyed designing it! Just a reminder, you can purchase the ad-free printable version here, or pin it for later here!

Copyright © 2024 · Theme by 17th Avenue